Upon logging into your account, you’ll be directed to the homepage, your default dashboard. This dashboard can be customize to provides a comprehensive overview of your key performance indicators and highlights tasks requiring your attention.
The Tooling Metrics interface can be divided into four main areas: header H, sidebar S, navigation bar N, and document list L.
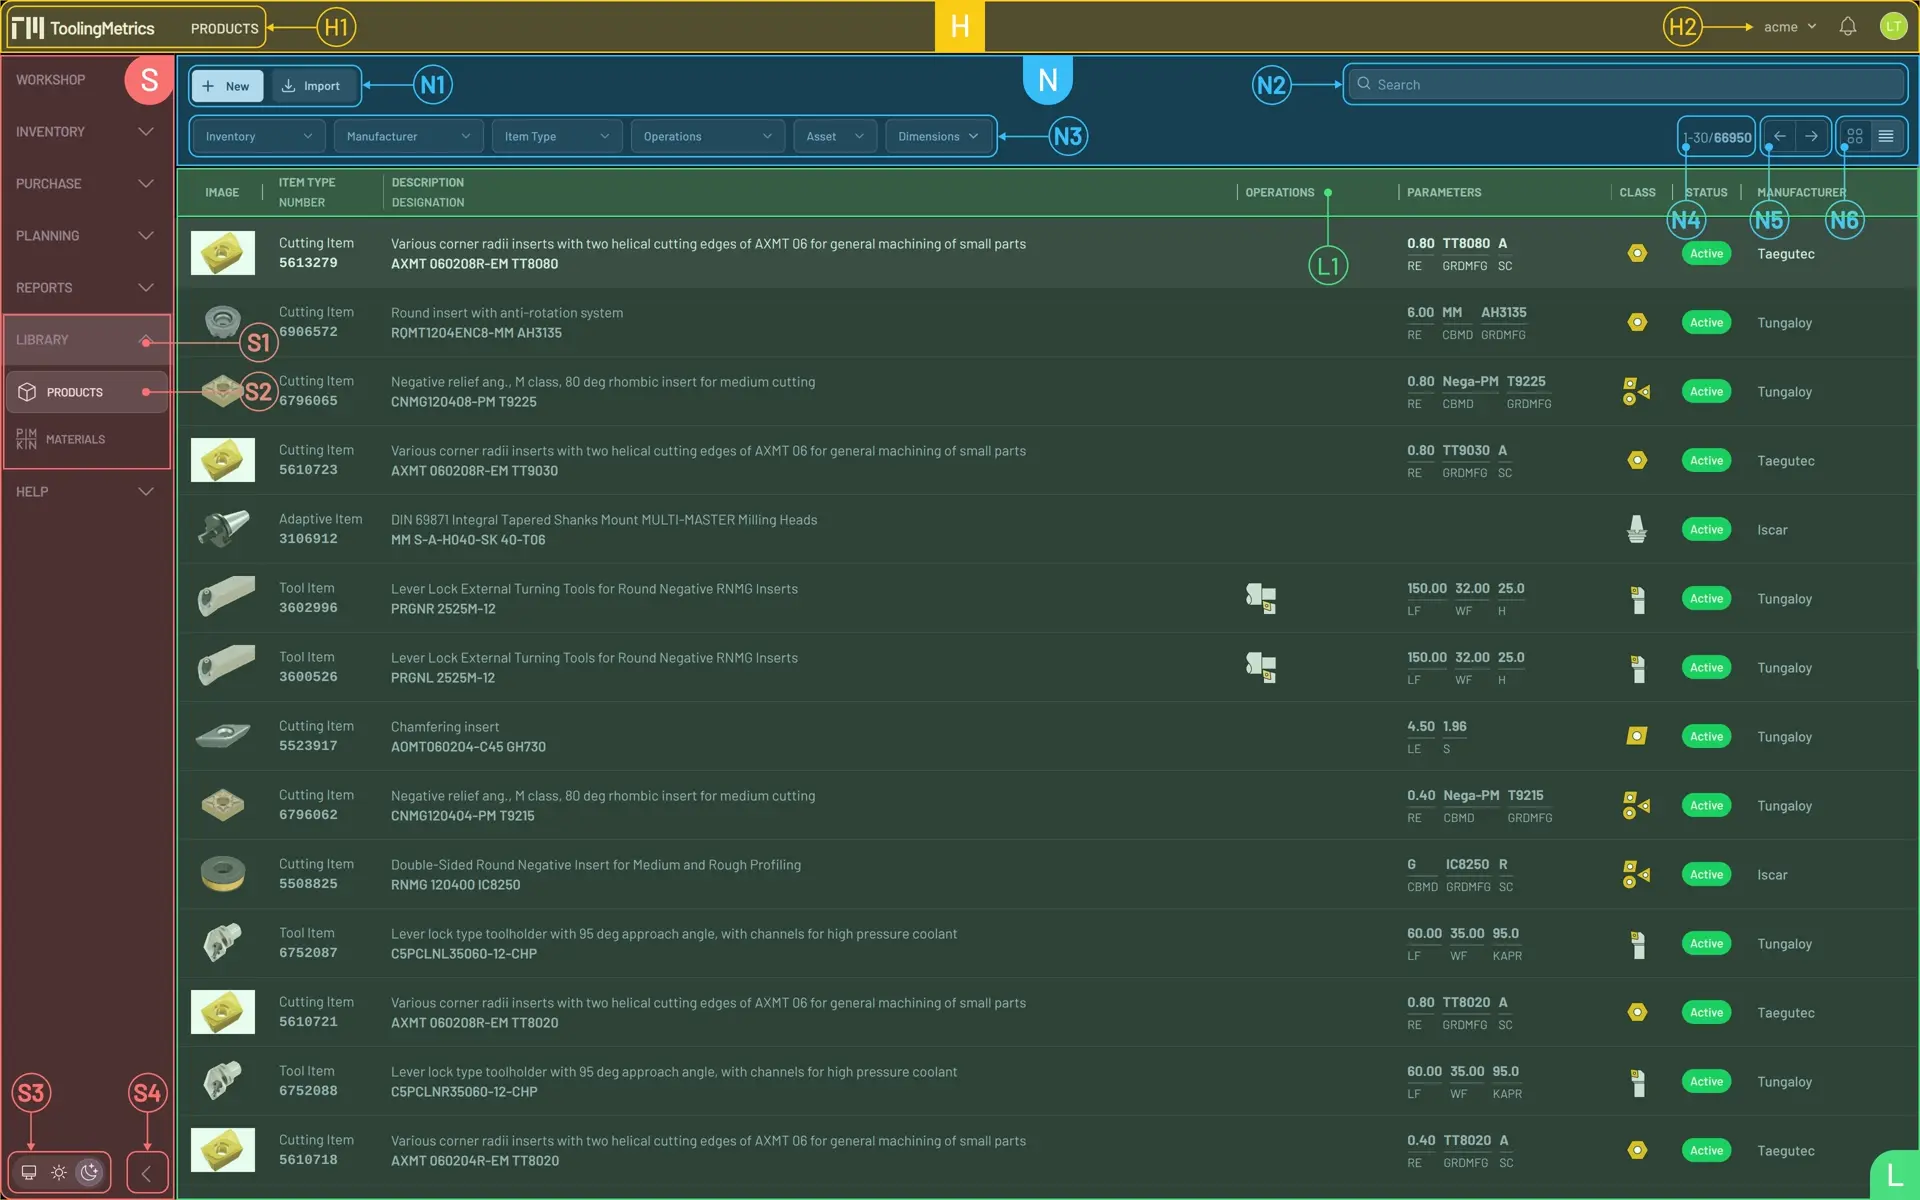
Header
The header allows you to quickly jump to the homepage by pressing the Tooling Metrics icon. Adjacent to the icon is the active document type you are currently working with. This information is located on the left side of the screen H1.
On the right side of the screen H2, you’ll find:
- Account: Click here to sign out and access your user settings. The settings page allows you to update your profile, configure language, measurement system, and time zone. You can also manage your account’s API token here.
- Notifications Center: Click the bell icon will display all notifications related to updates and background jobs. A red flashing dot indicates unread notifications.
- Organization: This displays your current organization. All documents you create belong to this organization. If you have access to multiple organizations, click here to switch between them. This is also where you can access the admin center if you are a site owner or belong to an admin group.
Sidebar
The sidebar lists all document types within Tooling Metrics. You can expand or collapse its width and show or hide document types using the S4 button at the bottom of the screen. The theme switcher S3 allows you to choose between dark or light mode interfaces, or set it to system to automatically match your browser’s theme.
Related document types are grouped into modules. Clicking a module displays all its document types. Selecting a document icon or name makes it the active document type S2, with all accessible documents shown in the documents list L area. The active module S1 is highlighted, and its document types remain visible, enabling faster navigation when performing specific tasks in the tool flow.
Navigation Bar
The navigation bar is a collection of toolbars that allow you to apply commands to one or multiple selected document records. It also helps you find specific records and display them in the document list.
- Action toolbar
N1contains the New command for creating new document records. It may also include other commands like Import, Export, or Delete, depending on the context. - Filters toolbar
N2is a collection of select boxes that allow you to narrow down results by selecting a value from a collection of attribute values. - When you know the value of the document attribute, typing it in the search box
N3and pressing Enter is the best way to find matching records. The document list will update to display only those records that meet all filter conditions and the search box value.
Documents List
The current record range is displayed in record numbers N4. It also shows the total number of records, as well as the pagination toolbar N5 when there are more than one page in the document list. You can navigate using the next and previous page buttons.
Depending on the type of active document, the layout switcher N6 is a group of buttons to change the layout of the document list.
- Table layout is the option you should choose when you need more detailed information in text and small icons. In this layout, you can also select items for bulk commands.
- Cards layout is more effective when records have a picture that represents them. With the larger picture, you can identify the record faster than in table layout.
The search term, layout, and filter selections for each document type are saved and persist across browser tabs until your session expires.
When you move the cursor to one of the table column headers L1, you can click the link to sort the document records by that column’s values, either in ascending or descending order.
Clicking a table row or a card will direct you to the document detail. The document detail displays document attributes and aggregates other related documents.
Document Detail
The document detail area D includes the breadcrumb D1 on the left and the document status highlighted in the document type status bar D2 on the right. Clicking the document type name returns you to the document list.
Document attributes and other related documents are organized into sections, accessible via the tab bar D3.
On the right side, the document history D4 allows you to add comments and view the timeline of comments and changes.
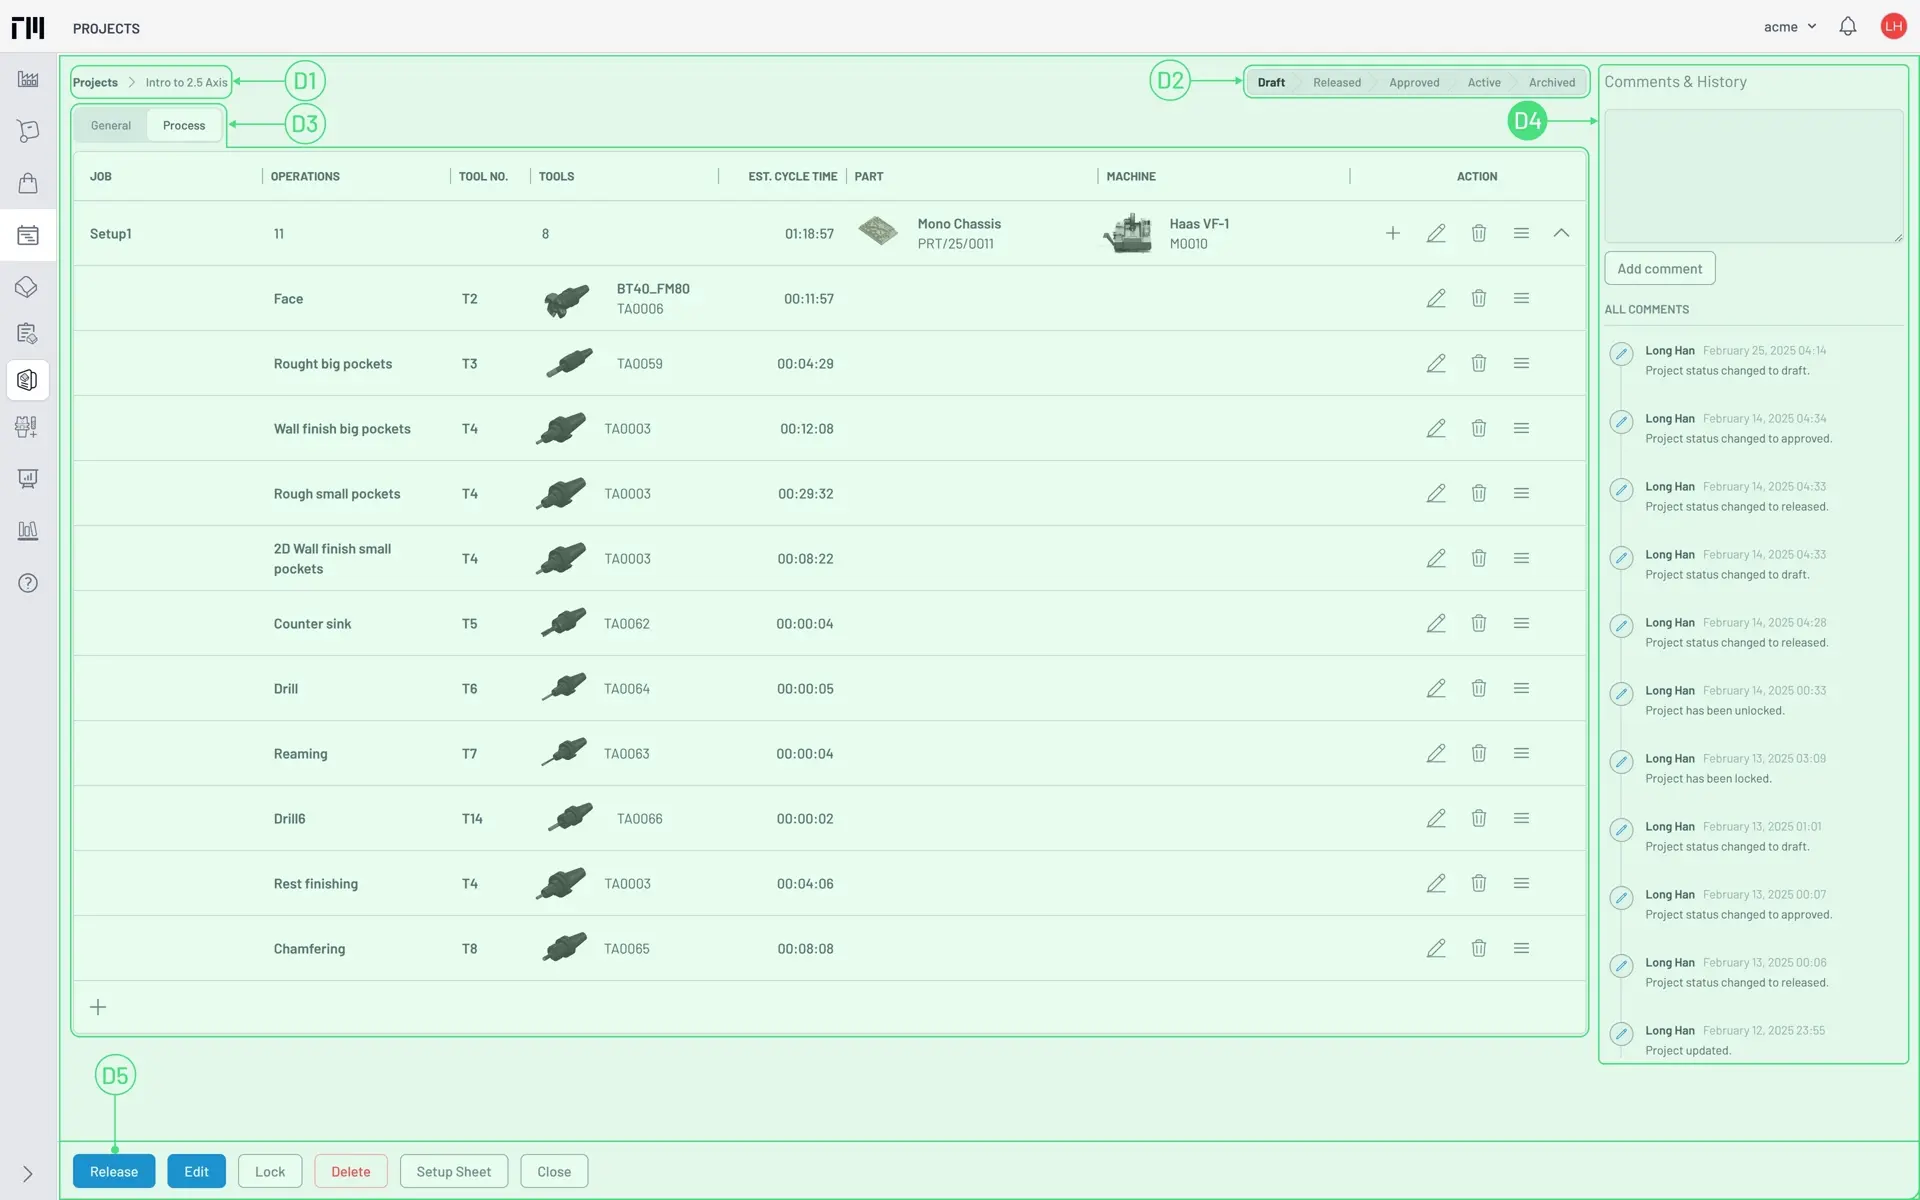
Clicking a document reference D4 allows you to navigate to the referenced document. For example, a purchase order record references its vendor, just as a purchase receipt references its purchase order.
The left side of the bottom toolbar D7 contains commands like Edit, Delete, or Print. The right side may contain additional buttons for displaying related data.
Tooling Metrics supports viewing various attachment file types directly within the interface—such as images, 2D drawings, and 3D models—using the attachments viewer. Clicking and holding the V5 button allows you to resize the attachments viewer.
Attachments Viewer
The attachments viewer allows you to view several attachment file types: image (PNG, JPEG, GIF), 2D drawing (DXF), and 3D model (STEP). All available attachments are listed in the attachments switcher V1 at the bottom. Pressing an image thumbnail, 2D, or 3D icon will open the attachment content and make it the active attachment V2.
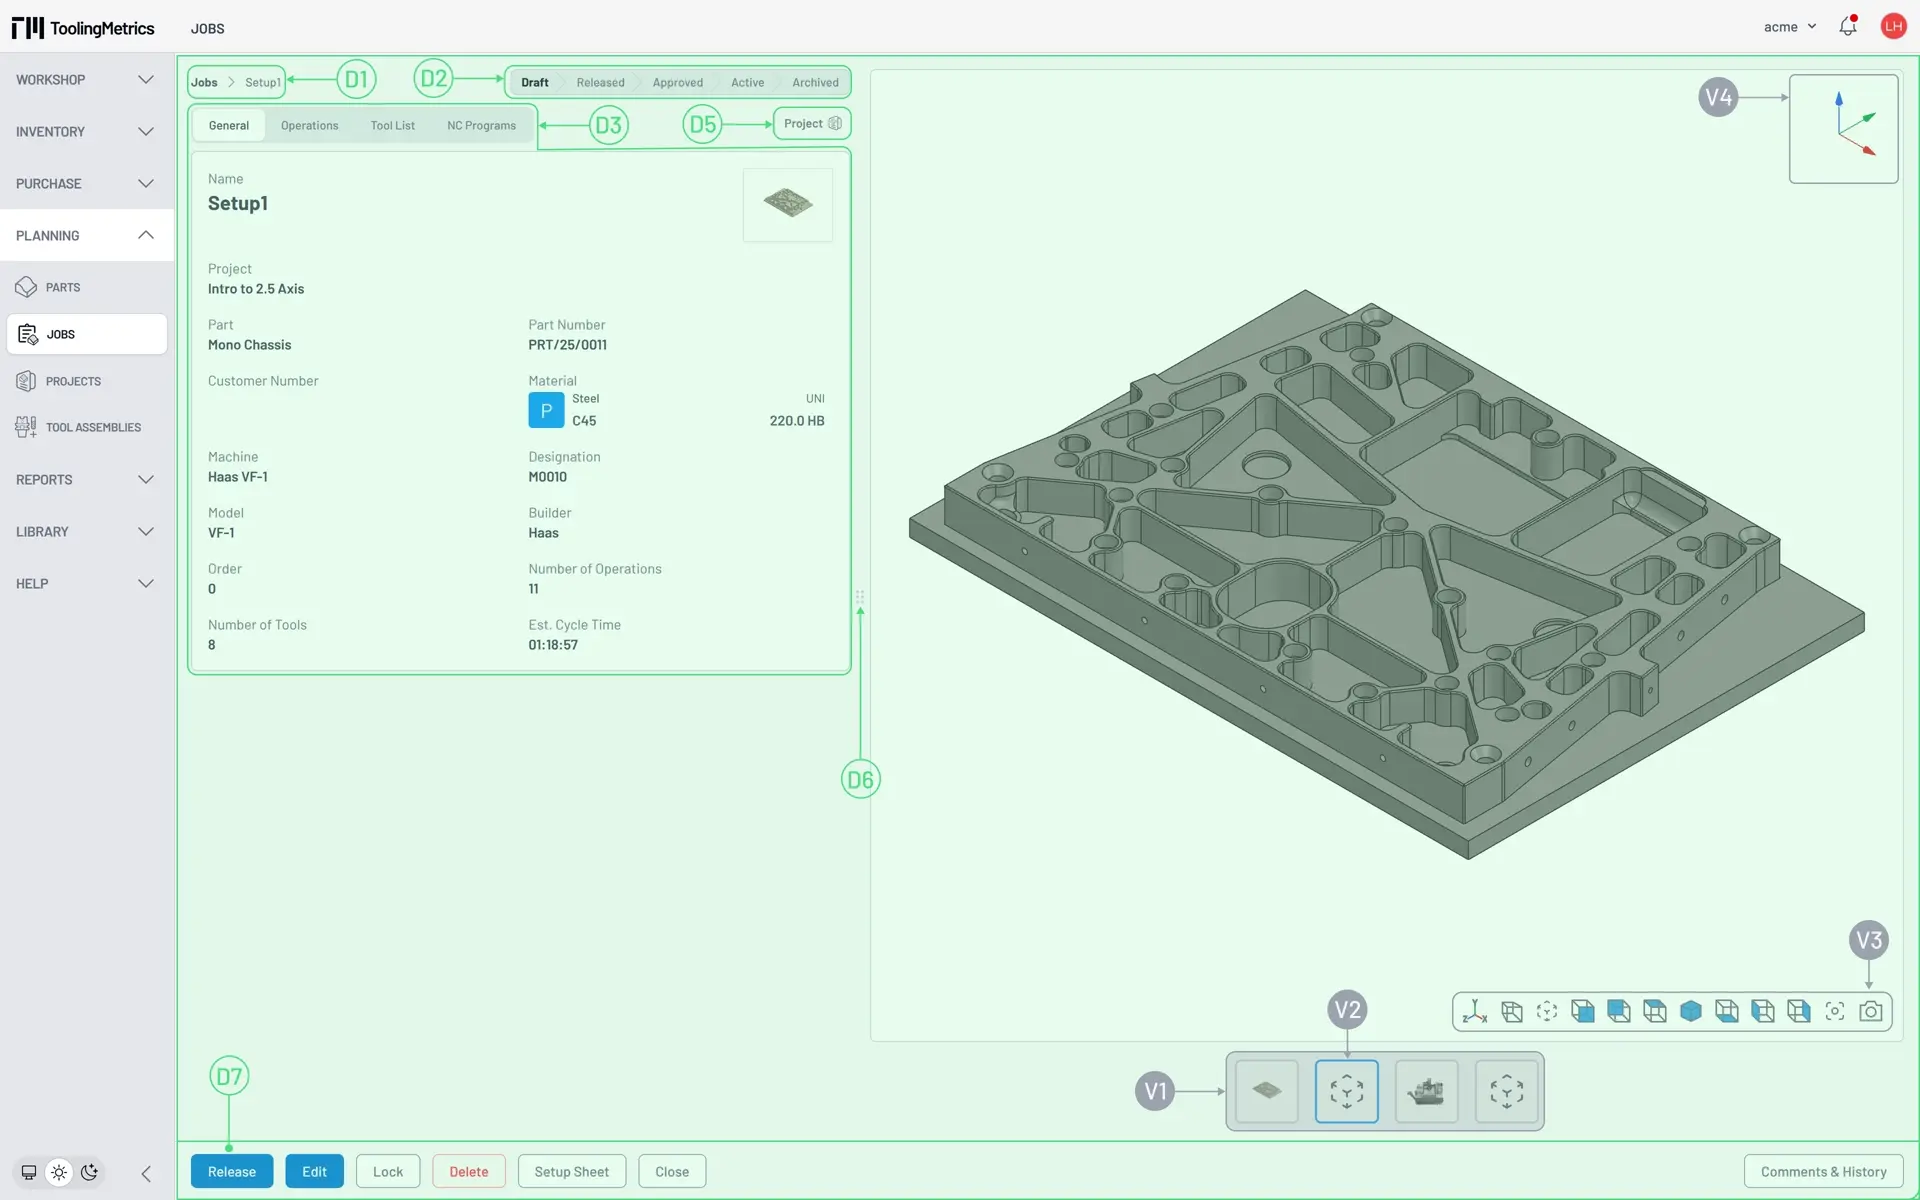
When viewing a drawing or model, a CAD toolbar V3 and CAD coordinate system icon V4 are displayed. The coordinate system icon indicates the XYZ axis orientation.
The toolbar provides buttons for orbiting the model to predefined positions, moving the model to the center of the canvas, and capturing the canvas as a picture. You can also use the keyboard to orbit the model with the four arrow keys, and pan with A, D, W, S keystrokes. You also have some settings to control the appearance of how models are displayed in the canvas.
You’re now ready to start hands-on with the demo project. Don’t worry, you can return to this page at any time if you need help locating interface components!